Wednesday, May 16, 2012

Climbing and Skiing Pikes Peak

I’m getting ready for a two week vacation on the east coast with Katie and the kids starting this Saturday – family visiting and a week on the beach. As much fun as this will be, it equates to no mountains, no snow, no skiing. I needed to sneak in a few more turns before the mountains melt out while I’m gone. Sean called me a few days ago to ask about a day trip on Pikes Peak before my trip. I originally told him no because I have meetings stacked on top of meetings this week. After a few minutes I called him back to change my answer.

I went to work at 6AM to get a couple hours in before meeting Sean at the Cascade light on highway 24.  We paid our Pikes Peaks Highway entrance fee ($12/person this year) and drove to the pull-off one switchback above the Glen Cove gift shop and brake check.

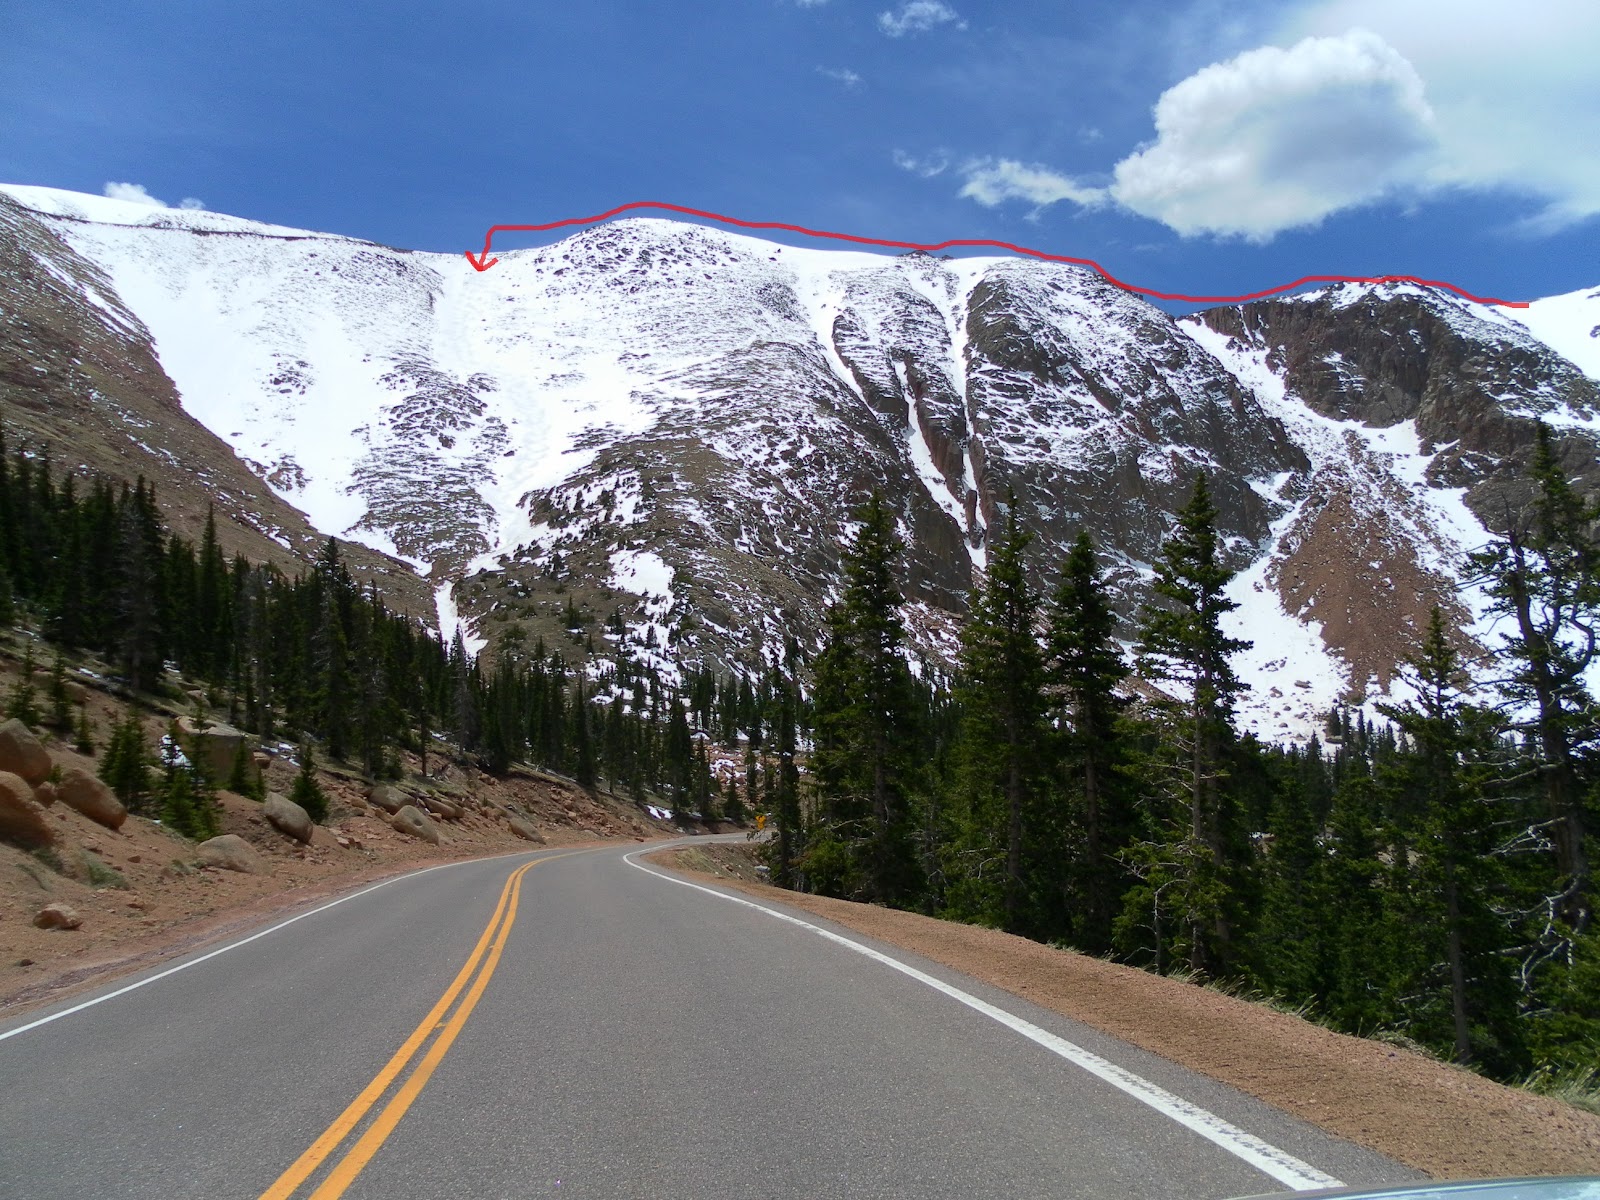
Our snow climb route in red
We climbed the Little Italy couloir. The snow was soft enough to kick steps with our AT boots so we left the crampons in our packs.  Coverage was thin in spots, exposing rocks and this couloir is fairly steep with a hard right turn at a rock pile at the bottom (like the bottom of the boot of Italy) so we decided to hike across to a wider slope that intersects the road a little higher up.

Sean at the bottom of the route
Our traverse from Little Italy to the bowl above Glen Cove

Throwing this pic in cuz Katie hates the Schlitz hat and I have a disturbing number of Sean pics
Self portrait climbing the couloir
The snow here made for some awesome spring conditions. It’s not that often we get to ski on Pikes Peak in consistent, smooth as silk snow (while wearing shorts). That lap was so much fun we couldn’t just leave but we didn’t have enough time to climb again - we both had to go back to work. I’m pretty sure Sean forgot his skins anyway.

Sean skiing the bowl

Backup plan: I drove Sean back to the top of the route and watched him ski down from the road. Then we switched and Sean dropped be off. So we both did a solo lap just as good as the first run.

The pull off at this switchback is where we dropped each other off for the solo runs
It was sad to throw the skis in the roof box and start driving down the mountain towards our desks knowing those were our last turns for the season. That being said…we wrapped the year up right and learned even in a bad snow year we can still find skiable terrain on the peak!

Last tracks of the season
Getting There: From Colorado Springs or Denver, head west on highway 24 past Manitou Springs to the traffic light in Cascade - turn left at the light and follow the signs for the Pikes Peak Highway (toll road). Road hours, rates, conditions found here: http://www.springsgov.com/sectionindex.aspx?sectionid=18

Route: We parked on a paved pull off on the left side of the road one switchback above Glen Cove, essentially at the base of the bowl pictured above. From the car we hiked across the road to the bottom of Little Italy. Once at the top of the couloir we traversed left again to the road and top of the bowl.

Precautions: As always safe backcountry travel habits and gear need to be used. Late spring usually offers safer snow but don't be a dumbass. The Pikes Peak rangers typically try to discourage people from skiing but they may have some helpful info on route conditions.

Monday, April 2, 2012

Ridgway Hut Trip

I usually try to post a trip report shortly after I get home but I'm delinquent on this one...no excuses, just been lazy. This was not a huge snow year for Colorado but Sean and I found plenty of coverage in the San Juan mountains near Ridgway. We had booked two nights in the Ridgway hut (http://sanjuanhuts.com/) far in advance and hoped for the best. We drove to Ridgway from Colorado Springs Friday and had dinner at Colorado Boy Brewery (great pizza, pretty good beer) and then tent camped at Ridgway state park before getting an early start up county road 5 while the snow was still frozen.
The snow was a little deeper than I thought. In all fairness, Sean warned me to stay left. Good thing we brought shovels. This little hiccup was worth the miles we didn't have to walk/skin on the mix of dirt and snow.
The debut of the gear sled, "Shirley", started with less coverage than hoped. I swear there is snow ahead. Once we hit the trees the snow was fairly continuous. Shirley and I quickly skipped over the honeymoon phase and moved straight to the "I hate you, you dirty little bitch" phase. Once I fixed the tie downs and better secured my 10 PBR cans in a bag of snow things were good again.
Sean taking a break to laugh at me going downhill with the sled.
I lost track of how long it took to get to the hut...around 3.5 hours I think. We had the 8 person hut to ourselves and we took our time unpacking and eating before putting skis back on to explore above the hut.
We climbed longer than expected to gain the ridge south of the hut. At least it was easier going without the damn sled dragging me down. Above tree line the snow was mostly wind slab even after a full day of spring sunshine.
The views of Mt Sneffels and Blaine Basin were awesome. This would have been a nice place to hang out with my camera gear at sunrise or sunset if I wasn't such a lazy slob.

By the time we funneled back down to the terrain trap we followed up through the trees we were tired, it was late afternoon and definitely time for some bourbon and PBR in the wood pile. Sean was more than mildly irritated by the fact the hut had NO chairs so we had to sit on pieces of firewood. It helped that it was sunny and very warm (shorts and t-shirt warm) with close to no wind...not bad for 10,200ft.
Looking back at our ski route above tree line. 
On Sunday morning we took our time getting started to give the snow a chance to soften up a little. We followed the gully again but took the left branch instead of the right we took the day before.
The trees opened up and we got great views of Reconnoiter Peak and the playground we would be skiing all day. Looks windy. We climbed up to the left shoulder of Reconnoiter below the summit block. We had to negotiate some steep wind slab to get there.

From here we traded skis and poles for crampons and ice axes.

Hanging out on Reconnoiter Peak

We climbed back down to our skis and skied into the tree line. We both shot some video of each other skiing the main face but it was too embarrassing to post. The wind slab with the occasional punch through was more than my limited skiing talent could handle. Once we got closer to tree line the snow was soft and consistent so we did some laps and hit a natural jump there about half a dozen times each.
Looking back at our route again

Time to head back to the hut for bourbon and beer again...and steak. That's right, steak, we don't mess around.
Sean cooking the steak the manly way...on the wood stove with smelly boot liners hanging overhead

We woke up Monday morning to light snowfall. We didn't waste a lot of time packing our gear and hitting the trail toward the car. We made good time getting out and Shirley cooperated nicely. It has been 70-80 degrees on the Colorado front range so we might be done skiing for the year. I guess it's time to start thinking about backpacking. Skiing Marble and Raspberry peaks will have to wait until next year.

To get there:
From Colorado Springs area - head west on 24 to Buena Vista, turn south on 285 and west on 50. Follow 50 all the way to Montrose and turn south again on 550 to Ridgway. Ridgway state park is on the west side of 550 just north of Ridgway if you are interested in camping there.  Go into Ridgway and take a right onto 62 at the Shell station. Go to the end of town (this won’t take long at all) and take the last left at the edge of town – Amelia St.  After about a ¼ mi and a couple stop signs turn right on CR 5 (dirt).  CR 5 is well maintained year round for the first ~5 mi. At the winter road closure there is a row of mailboxes and suitable trailhead parking for a few cars. We were able to drive a few miles past this on a mix of snow and mud since it was late March.

Route:
Continue to follow CR 5 to the Dallas trail which is marked with the standard forest service wood sign.  Turn right and head up a steep pitch.  If you are staying at the Ridgway hut you will have an info packet with a route description and crude map…bringing a trails illustrated map wouldn’t be a bad idea. The road, trail and hut are all marked on it. The total mileage from the winter trailhead is ~6.5 mi.  

Precautions: As always safe backcountry travel habits and gear need to be used. There is a good mix of terrain and a lot of options if you want to get buried in an avalanche. Late spring usually offers safer snow but the area can still be avalanche prone. In the words of the guy who booked our hut reservation: “Yeah, late March is a good time to go man, you should have fun, the kill factor is way lower.”


Thursday, February 9, 2012

Backcountry Skiing Mt Trelease - 2012

Today was our first backcountry trip this season. Snow was slow to show up in Colorado and by the time it did in January I was in the middle of a project at work that required 6 days/week of my time. Now that I'm done with that its go time. In normal fashion Sean and I decided to make a ski day that much better by skipping work to do it. Today was also our first backcountry ski trip since Brian went to Tampa and Rich moved back to England...sorry bros.

We headed up to Mt Trelease again...I think it's becoming our go-to spot. When we toured here in Dec 2010 we didn't see any evidence of avalanches but discussed the possibility of the top pitch sliding. Check out this pic of a slide from 29 Jan 12. (click to enlarge) Holy shit!
Photo by LSteele on backcountrycoalition.com
Sean skinning up skier's left of the parking lot
The trees on the lower portion skier's left of where we climb out of the parking lot seem more user friendly than where we have dropped back to the lot the past two times. We'll try to head left the next time but from what we've heard you cliff out if you go too far left.

Sean approaching the bottom of the avalanche run out
Sorry for the low quality video...this is my point-n-shoot camera


Here is a link to Sean's hero cam footage:

After our second lap we dropped back to the car and hit the road for Idaho Springs to stop at Tommyknockers for lunch and a couple beers. We're hoping to hit this mountain again on consolidated spring snow and ski the top pitch from the ridge where it didn't slide in Jan.
Pour one out for our homies...
To get there:
From the Denver/Colorado Springs areas - head west on I-70 until you are almost to the Eisenhower Tunnel. Take exit 216 where there will be a dirt parking area on the north side. Park against the cliff band, this is the base of Mount Trelease.

Route:
Leaving the parking lot is fairly obvious because there aren't many options to skin or snow shoe past the exposed dirt face. Once through the initial steep entry there is typically at least one good skin track to follow unless there has just been a fresh dump of snow. In that case, break a sweat to get first tracks! There are a lot of well spaced trees on the upper portion of the mountain but it does get a little choked as you drop close to the parking lot.

Precautions:
This area might be close to the highway but safe backcountry travel habits and gear need to be used. There is a good mix of terrain and potential avalanche danger so be prepared. See the first photo in this post if you don't believe there is avalanche terrain.

Saturday, October 1, 2011

Fall Photo Mad Dash

Our second son, Ben, was born September 7th and as it turns out, you're more than just twice as busy when you have two kids. Needless to say, I hadn't been running to the mountains with my camera. The fact that I'm writing this September 11 post in February 12 is a good example of the time constraints.

That being said, fall is my favorite time to wander around the mountains with my camera. On top of that, with a new little boy in the house, Liam could use some quality time with dad. So I packed up the car and told Liam we were getting up early for a special trip. We left at 3AM - the plan was for Liam to sleep in the car between home and Crested Butte - this plan failed. He did not sleep more than 30 minutes.
Liam taking a break on Kebler Pass
We made it to Kebler Pass outside Crested Butte right around sunrise and hiked through the many aspen stands looking for good pano shots. Below are some of the images we captured together (Liam pushed the shutter release for me a lot).


After hiking and shooting for a while in the morning we drove over Ohio Pass which connects to Kebler. I think the 3AM start caught up with Liam because I looked in the back seat and he was passed out (after crumbling a sticky cereal bar all over my car). A quick look at the map and I had a new plan - drive out the west side of Kebler Pass toward Paonia State Park. This gave Liam a chance to sleep while I drove over McClure Pass to Snowmass. We stopped in Carbondale to make sandwiches for Lunch and confirm directions to the Capitol Creek trailhead. Once again, sticky peanut butter and jelly in my car, this time on the dash.

We drove to Snowmass (near Aspen) and drove up the rough Capitol Creek dirt road. Liam called it "the bumpy road" and was pretty amused by it (I think my Outback disagreed though). Once there we had to wait out a little storm and dodge some angry cattle but hiked for a while along the trail to scope some spots to shoot from.

Hiking along the Capitol Creek Trail
Now we were just waiting for the clouds to clear off Capitol Peak in the background. We were rewarded for our patience:
Capitol Peak and fall aspens from trailhead overlook
Capitol Peak after the storm

Sunset on Capitol Peak

Liam having a snack while we wait for sunset
After sunset I got Liam ready for "bed", loaded up the car and drove back down the "bumpy road". We went through Aspen to drive over Independence Pass to get home. I had never driven this route in the dark...I did NOT enjoy it. Fortunately, it didn't take too long for Liam to fall asleep. After 450+ miles and 6 passes (Wilkerson, Monarch, Kebler, Ohio, McClure, and Independence), our 20+ hour fall mad dash around Colorado was complete. And we were tired!

Sunday, September 25, 2011

James Peak Day Hike

Today my two year old son, Liam, and I climbed James Peak with Sean and his son, Dane. James Peak is a 13,294 ft peak easily accessed from St Mary's Glacier off I-70 outside Idaho Springs. We just wanted to get out of the house for some fresh air and exercise. I think Katie also appreciated the peace and quiet with our newborn son, Ben.

The hike starts out on a wide boulder laden trail. It's a short hike to the base of St Mary's Glacier. There were skiers coming down as we climbed up - I'm pretty sure I could see the teeth rattling out of their heads as they bounced over sun cups big enough to swallow a compact car. I love backcountry skiing but let's not make it into something it's not...it's late September after all.

St Mary's Lake with the base of the glacier visible on the right
Sean and Dane hiking up the glacier
Liam on the plateau above the glacier, James Peak in the background
We stopped for lunch before heading to the summit. Dane was not super motivated to keep going but Sean guilted him into it so we pressed on. Oh well, I guess I have to carry Liam to the top then. It should be noted that from this point forward Dane totally rocked it.

He's getting heavy these days
Liam seems appreciative of the free ride and the new Deuter pack is pretty comfortable for all parties involved.

The upper lake in a chain of six (Ice Lake?). The trail continues up to the right from where this pic was taken.
On the summit - Milo went with us too
Sean and Dane on the summit, the Winter Park valley in the background
Liam and me on the summit - our first 13er together
Getting there: From Denver, take I-70 west just past Idaho Springs to exit 238 for Fall River Road. Stay on Fall River Road for approximately 10 miles following signs for St Mary's Glacier. Parking is somewhat limited in two lots near the trailhead - the lot we parked in is private and cost $5 (not sure about the other).

Route: This trail is approximately 8 miles round trip. It is very easy to follow to the glacier and then you hike up the glacier or along the edge of it. The trail levels out on a broad plateau above the glacier. It crosses 4WD trails once or twice before climbing steeper again toward the summit.

Precautions: Make sure you bring plenty of clothes for little kids. The wind funnels down the glacier and it can get cold.

Monday, July 25, 2011

Backpacking in the Gore Range

I've wanted to hike in the Gore Range near Vail, CO for a while now and finally made it a point to plan a trip. Katie's due date for our second kid is Sep 7th so I figured it would be safe for one last overnight adventure before the baby countdown begins. This adventure includes Matt, Sean, and Rob for a three night backpack essentially from Silverthorne to Vail, CO. We started last Thursday night after a half assed day at work. About 30 minutes into the hike Sean realized he forgot his whiskey and decided to run back to the car for it. I waited for him while Matt and Rob kept going. It was a GREAT idea to get the whiskey but a BAD idea to split up. Matt and Rob got lost before the junction with the Gore Range Trail where we were supposed to camp the first night. Sean and I must have walked right past them and a significant way up the main trail before backtracking to look for them. We found them below the junction just before dark, set up camp in the dark, and ate dinner around the fire. Rob brought his tent and the rest of us slept under the stars every night.
On day two we broke camp late and headed toward Red Buffalo Pass on the Gore Range Trail. I had high hopes for hitting peak wildflower season so I was loaded down with camera gear. However, it looked like late June rather than late July - snow was still just melting out in a lot of areas.

Glacier Lilies are the first blooms on Red Buffalo Pass

Matt hiking up the east side of Red Buffalo Pass

From the summit of the pass
From the summit of Red Buffalo Pass the trail turns into the Gore Creek Trail dropping down the west side to Gore Creek on the valley floor. Our plan was to camp at Gore Lake so we didn’t really feel like dropping 1,000ft just to climb another 1,000ft back to the lake. We decided to head off trail maintaining our elevation as much as possible on the way to the lake. This was a lot of side hilling with heavy packs. Eventually we crossed the outflow from Gore and Snow lakes combined and intersected the Gore Lake trail. We happily dumped our packs and lounged around the lake after setting up camp.
This was my first trip really using the REI Minimalist bivy sack - it was pretty sweet
We camped at Gore Lake Friday and Saturday night. Sean and I were initially happy we brought our fishing rods because the lake has MONSTER rainbow trout in it. Then we figured out why the fish are so big - they aint stupid! We couldn't catch a thing. I may have thrown a few rocks at them in retaliation. Fortunately for the trout there were other people camping at the lake or I would have done some handgun fishing just to teach them a lesson. Oh well, time to shift focus to photography...

Gore Lake Sunrise
Rob hiked out toward Vail Saturday morning so he could get home to brew some beer for a wedding. Matt relaxed around camp. Sean and I did some climbing around the lake.
Sean near the summit of the peak shown in the sunrise pic above

Me perched on a rock ledge overlooking Gore Lake (photo by Sean)

Alpine tarn reflection at sunrise (short hike from Gore Lake)
Getting there: Take exit 205 off I-70 and head north on 9 in Silverthorne. Hang a left at the light and keep driving to the back of the Wildernest neighborhood (there is construction right now so exact turns will change a little). There is plenty of parking at the Buffalo Cabin trail head on the paved road. We dropped Sean's jeep at the Gore Creek trail head further west on I-70. To get to this trail head, take exit 180 and cut back east on Bighorn Rd.

Route:  From the Buffalo Cabin trail head we hiked north for approximately 1.5 miles to the area around the junction with the Gore Range Trail. We camped hear for the night. The second day we hiked west over Red Buffalo Pass and skirted the northern slopes on the west side of the pass off trail to get to Gore Lake without dropping back down from the pass. We camped at Gore Lake for two nights. From Gore Lake we hiked back down the trail (lots of downed trees across the trail). This trail intersects the Gore Creek Trail at the marker for a grave. From this point we turned west (right) onto the Gore Creek Trail and hiked out to the Gore Creek trail head. There is a lot of water along this route and also a lot of mosquitoes so bring your bug spray.

Precautions: The trails we used are usually well defined and easy to follow but apparently you can still lose your way in low light if you’re not paying attention so its probably not a good idea to split up if you aren't familiar with the area. Also worth noting: this route runs east-west along the north side of I-70 between Silverthorne and Vail so there is actually intermittent cell phone coverage, making a cell phone a worthwhile emergency tool. Don't count on it though because this is still rugged and somewhat inaccessible wilderness.